Data Uploader You Must Map to Salesforce Object Id
Overview
Cloudingo'southward Find Information feature lets y'all upload information from a spreadsheet (like names) to find corresponding data in Salesforce (like record IDs) for whatsoever object, any field - including related object data. Simply upload your file and scan it to encounter if the information already exists in Salesforce, specify what field values you want to pull back from Salesforce if we observe a match, then download the results into a .csv file to further manipulate, import, or update Salesforce records.
► Video: Observe Data Quick Overview
Navigation
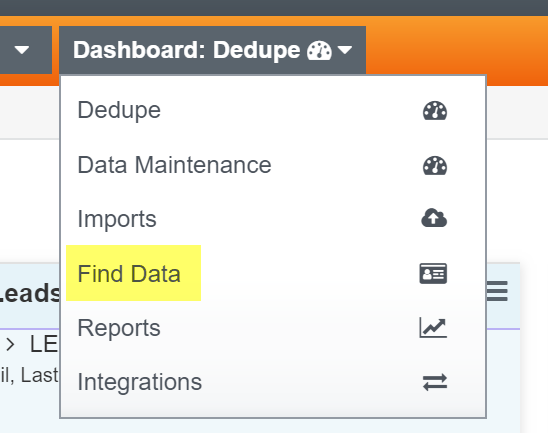
To navigate, choose Find Data from your Dashboard menu options.
Tab i: Choose Object and Upload File

This is where yous volition upload your file and choose which object you need to scan to place if a matching record exists.
- Description:Name your upload
- Salesforce Object:Select the object (type of record) that you will be performing your scan on to look for existing records. In this example, nosotros are loading a file to attempt to notice the Account ID (based on Account Proper noun), and so the object would exist set to Account. You lot tin select any standard or custom object from the listing. Your file can contain values from other related objects and that data volition be retained in the Consign file.
- File Data Source:File must be in CSV format.
- File:Scan and observe the CSV or tab delimited file on your local computer.
- File Options:
- Leave the "Has Column Headers" box checked if your file contains a header row.
- If your file contains European date format (dd/mm/yyyy) instead of United states date format (mm/dd/yyyy), cheque this box.
- Decimal separator for numeric values default is to utilize comma separators for numeric, choose 'Period' if your file contains Period separators instead of comma.
Click the Load & Continuepush button.
Tab 2: Select & Map Fields
Cloudingo volition attempt to auto-map all columns in your file to the corresponding fields in Salesforce.
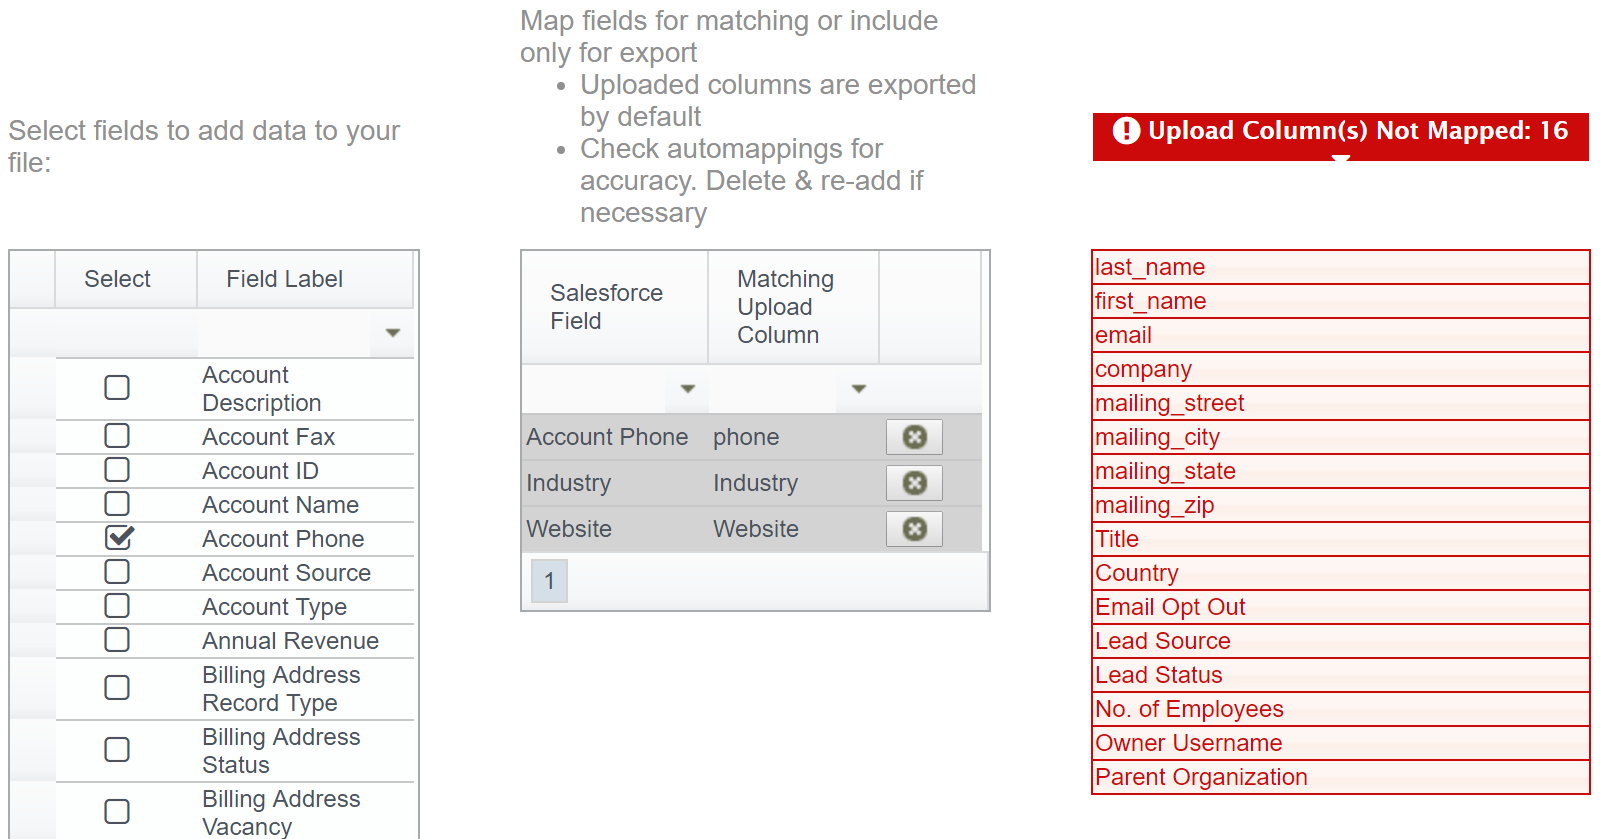
All fields in your file that are not mapped will automatically announced in the 'Upload Column(s) Not Mapped' department. Click the Upload Column(s) Non Mapped box to expand the list of column header names for a full view (seen above).
Yous must map at least one field in your file to continue with the scanning process. You but need to map fields that you intend to apply every bit function of your matching criteria (for instance, if you lot are looking to notice the Business relationship ID based on Account Name, City, and State, you must map all three of those fields to the corresponding Salesforce field).
All other fields can simply exist ready to 'Consign Only' for values yous only desire to retain in your final export file. (Notation: It is fine to map other file columns to fields, and information technology is fine to leave correctly auto-mapped fields mapped; information technology is non required.)
Check auto-mapped fields for accurateness.
To add fields for mapping or for export, find the field name in the list of available fields (on the left hand side) and check the box next to the field name.
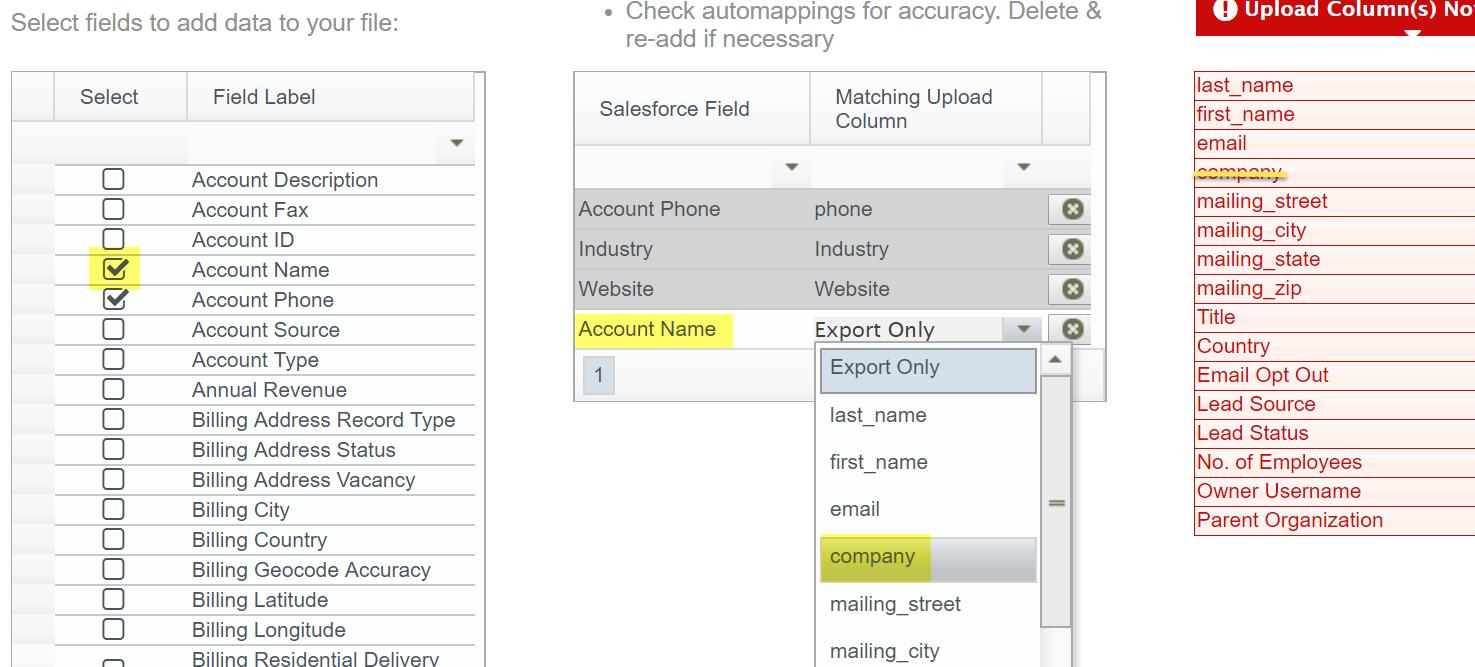
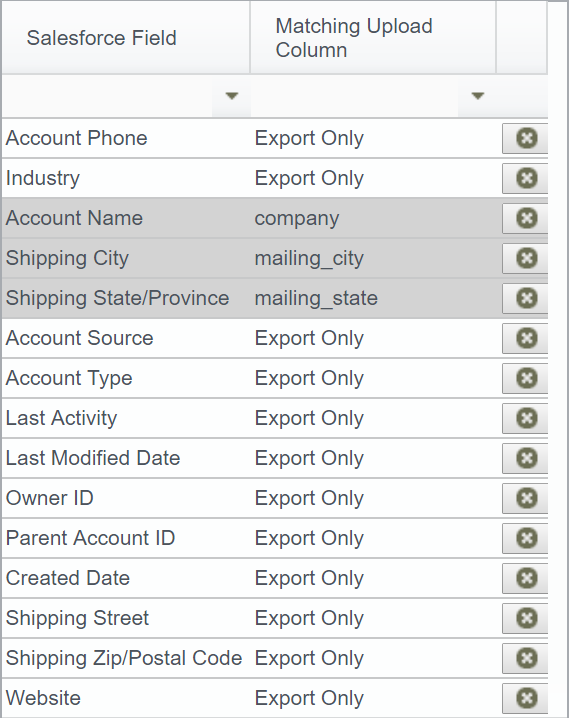
In the example above, nosotros are using Business relationship Proper noun in our file as one of the matching fields to identify existing Account IDs. Check the box to the left of the field, and it will exist added to the selected listing on the right paw side. The default Matching Upload Cavalcade will be set to 'Export Merely'. Match the Salesforce field with the corresponding File column in the list if you lot need to map the field for matching. As y'all map fields, they will drop out of the Upload Columns(s) Not Mapped list in carmine.
Add & map any boosted fields you volition exist using in your matching criteria. All mapped and unmapped fields provided in your upload will automatically be included in your export file.
Add whatever boosted fields that you desire to include in the export if a match is detected by clicking the boxes to the left of the field proper noun in the available field list column. Leave the Matching Upload Column selection set to 'Export Simply'. Fields mapped for matching will exist highlighted in gray. Consign Only fields will brandish in white.
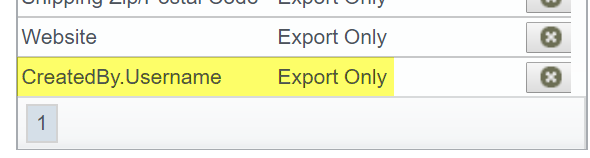
Related object field values tin can also exist included for mapping or for consign but. Related objects will display an arrow just to the left of where the checkbox would normally be. Click the arrow to expand the related object field list. Employ the search options but beneath the headers to find the field name you wish to include. Click the down arrow in the search to meet filter options (Begins with, Contains, Equals, etc.). In the example below, nosotros are including information from the User object in Salesforce to capture the Created By Username for export.
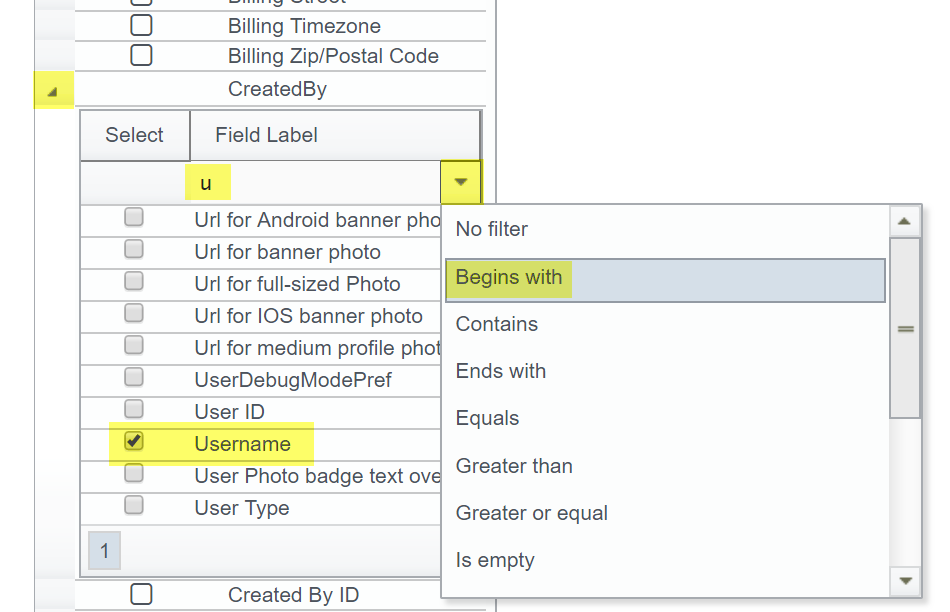
When you check the box on a related object field, it will exist added to your selected field list for you lot to map or set up to add to the Export but.
Click Continue to motion on to Step three. Click Save as template to relieve configurations at this stage for time to come employ on file uploads that employ the same formatting.
Tab iii: Limit Results
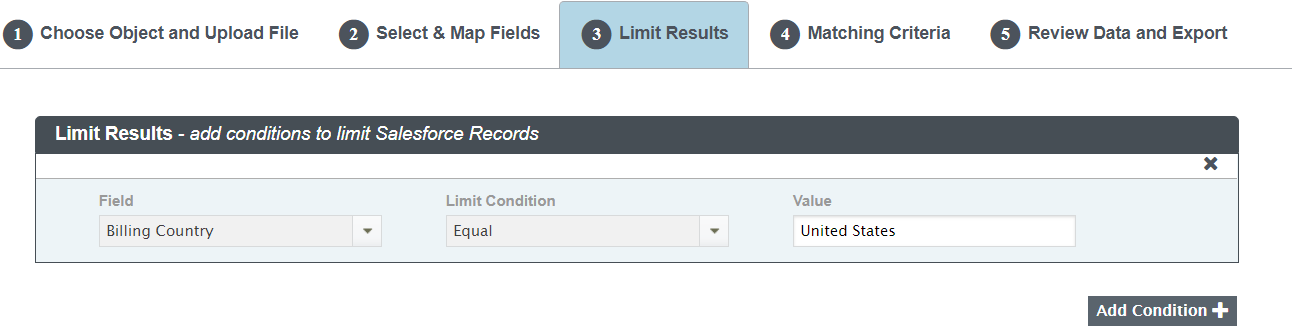
Click Add Status to set whatever atmospheric condition that you lot want to use to limit which records will pull into the results (such every bit Record Type, Country, etc.) You lot may prepare upward multiple weather if desired.
Click Continue to motility on to Footstep 4. Click Salve equally template to save configurations at this phase for future utilize on file uploads that use the aforementioned formatting.
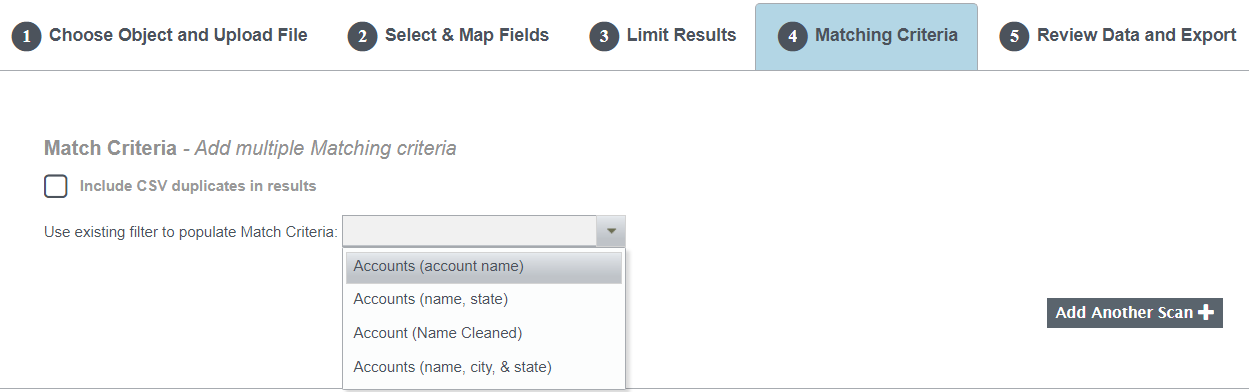
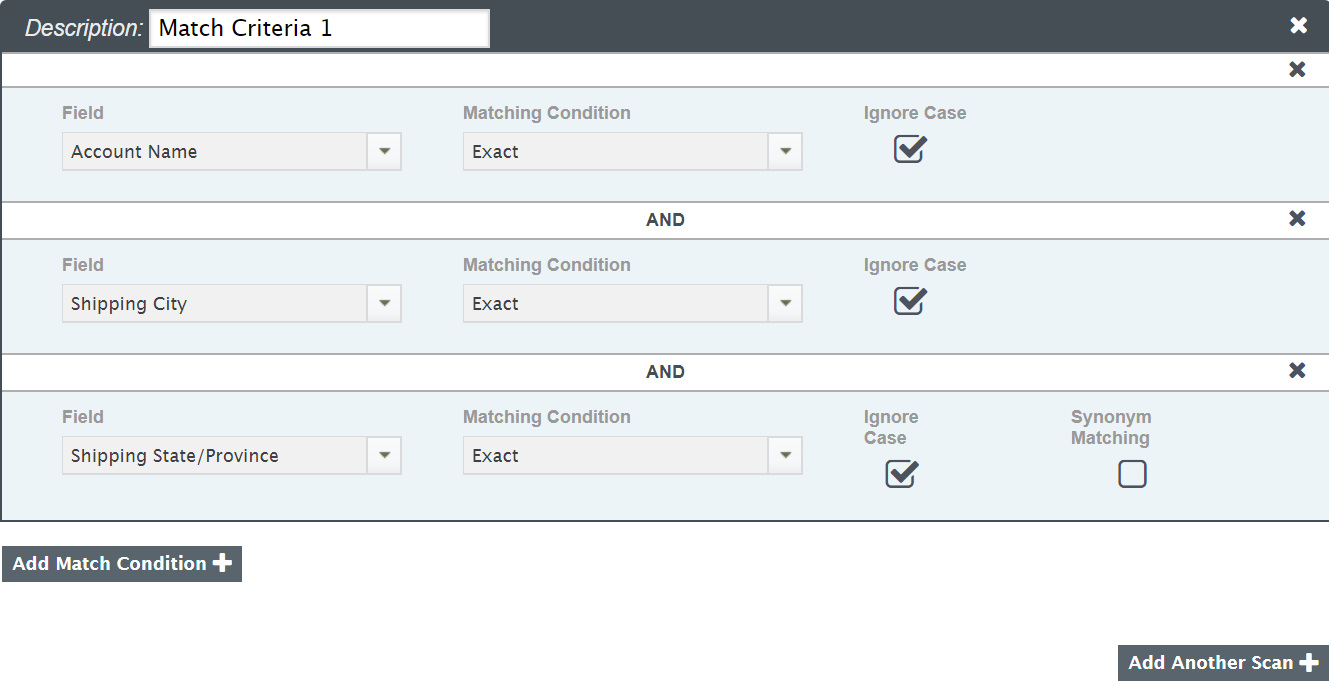
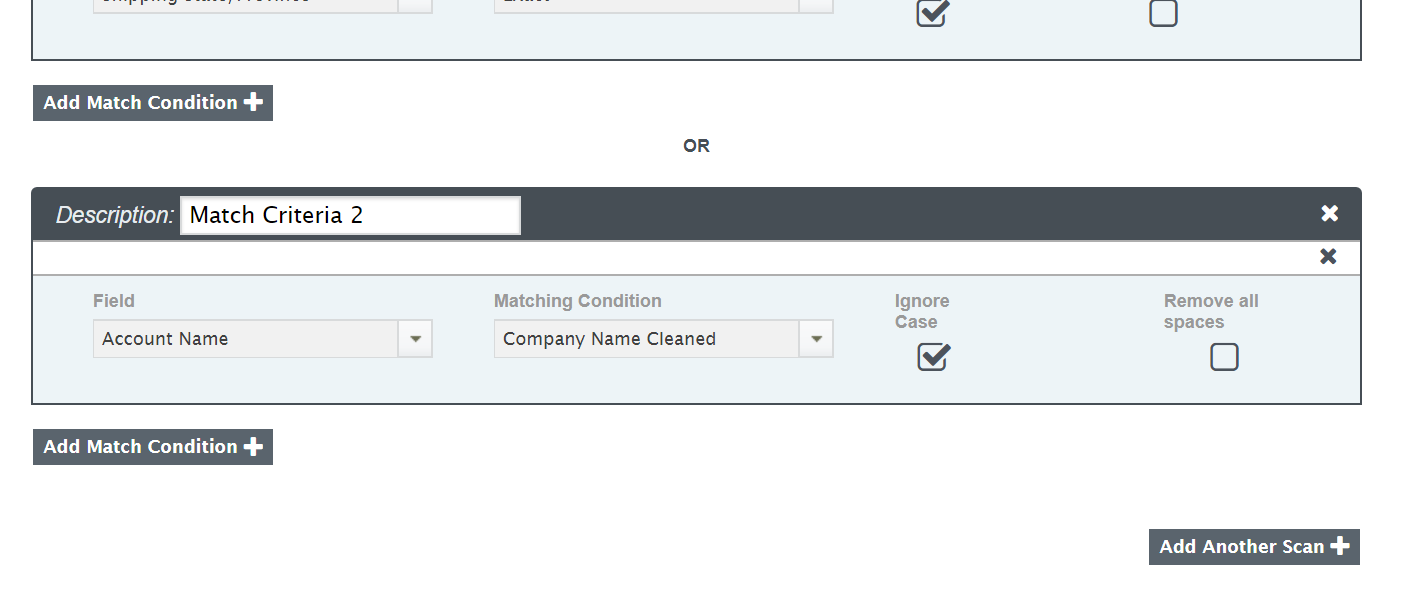
Tab 4: Matching Criteria
Cheque this box if you lot Exercise want to include the original rows from your file (even if no friction match is identified). If you practise NOT want not-matched records to be included in your output file, go out the 'Include CSV duplicates in results' choice unchecked.
Set up your matching criteria. Cloudingo will scan Salesforce for the field(s) configured hither to identify if a record match exists for the field(s) specified. If you already have a dedupe filter configured using the matching fields yous wish to use, select the filter from the 'Apply existing filter to populate Match Criteria' list.
Once you lot cull the filter from the drib listing, the fields and matching atmospheric condition will automatically populate in the Match Criteria section.
Warning
If your filter is using fields that you did not include in your mappings during Step ii, you will simply be able to cull the fields from your mapping listing. Fields not mapped will appear bare with a ruby-red outline in the Field drib box.
Brand any changes as necessary.
Click Add together Match Condition if you demand to add another field match to the existing matching criteria. Note: You will receive an mistake if yous accept no more boosted fields mapped (in Step two) for matching.
Filters are just available for copying field lucifer configurations for quick entry. The matching criteria here is completely independent of your filters. Changes made on this page will not impact existing filters.
Yous can run your file through two matching criteria scans if desired. Select a second filter from the filter list at the peak of the page to pre-populate a second scan matching criteria. Or click the Add Another Browse option to manually setup your second configuration for matching.
Click Relieve as template to relieve configurations at this stage for futurity use on file uploads that use the aforementioned formatting.
Click Find Information to run the scanning process to obtain your results and export information.
Tab 5: Review Data and Export
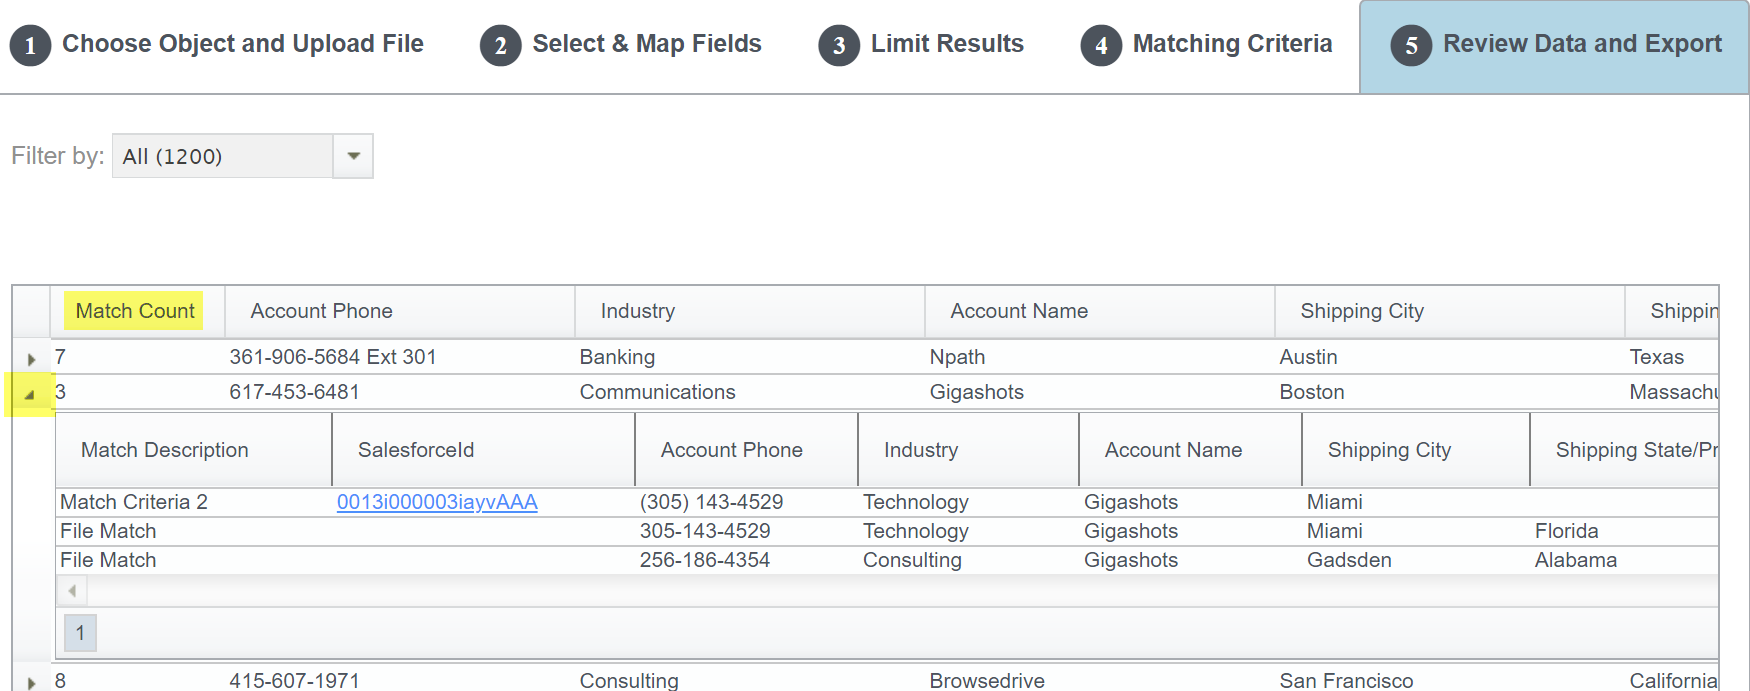
All columns from the original upload, plus boosted columns (if a match was detected) will be included in the retrieved data.
The start column (Match Count) will display how many record matches were detected. Counts include both Salesforce record matches and file duplicate matches. Each row in the output will display an arrow to the left of the Match Count cavalcade. Click the arrow to expand details for the record you wish to view on the screen.
Y'all can make adjustments to your Find Data criteria in previous tabs if necessary and re-scan the file again from tab four (Matching Criteria).
Click Export Results to export all data to a new CSV file. Output tin and so be manipulated in Excel and re-saved to CSV for import if necessary.
Videos
Video: Find Data Quick Overview
Video: Find Data Tutorial
Webinar: Discover Information
Source: https://help.cloudingo.com/docs/find-data
0 Response to "Data Uploader You Must Map to Salesforce Object Id"
Post a Comment